AI Image Generator with Stability and Tigris
Generative AI is a fantastic tool to use to quickly create images based on prompts.
One of the issues with some of these platforms is that they don’t actually store the images in a way that makes them easier to retrieve after they’ve been created. Oftentimes you have to make sure to save it immediately after the process is completed, otherwise, it's gone. Luckily, Stability offers an API that can be used to programmatically generate images, and Tigris is the perfect solution to store those images for retrieval.
In this article, you’ll learn how to deploy an app to Fly.io that will allow you to generate images using the Stability API and automatically store them in a Tigris bucket.
The Stability AI Tigris Database
Let’s take a look at what you’ll be deploying. There are several key components of the project:
- A Next.js app that the user interacts with
- An API endpoint (which is part of the Next app) that processes jobs.
- A background job that periodically polls for new jobs.
- A Postgres database to store jobs
- A Tigris bucket to store the generated images.
The Next.js app
The first part of the project is a Next.js project that contains a single page
that users will interact with. There is a simple form that accepts a prompt and
image dimensions. This form uses server actions to store the request in the
jobs table of a Fly Postgres database. Each grid item will periodically poll
the table to check on the execution status of each job.
The API processing endpoint
The Next project also contains a single API endpoint that is used to execute jobs against the Stability API before storing the results in a Tigris bucket. This allows for a queue-like structure where jobs can be processed asynchronously.
This endpoint does much of the heavy lifting to make this app possible. Let’s step through what happens when it’s called.
It will start by checking to see if there are any jobs with a status of
pending (0):
let res = await db
  .select()
  .from(jobs)
  .where(eq(jobs.status, 0))
  .limit(1)
  .execute();
If a job is found, the status is set to in progress (1). This prevents other
executions from processing a job twice.
await db.update(jobs).set({ status: 1 }).where(eq(jobs.id, job.id)).execute();
Next, the prompt and image dimensions are sent to the Stability API for generating an image. The base64 encoded image is returned in the response from Stability.
const engineId = "stable-diffusion-v1-6";
const apiHost = process.env.API_HOST ?? "https://api.stability.ai";

// Request an image from Stability
const stabilityRes = await fetch(
  `${apiHost}/v1/generation/${engineId}/text-to-image`,
  {
    method: "POST",
    headers: {
      "Content-Type": "application/json",
      Accept: "application/json",
      Authorization: `Bearer ${process.env.STABILITY_API_KEY}`,
    },
    body: JSON.stringify({
      text_prompts: [
        {
          text: job.prompt,
        },
      ],
      cfg_scale: 7,
      height: job.height,
      width: job.width,
      steps: 30,
      samples: 1,
    }),
  }
);

let rb = await stabilityRes.json();
if (!rb.artifacts) {
  throw new Error(`${rb.name} -- ${rb.message} -- ${rb.details}`);
}
Then we can take that image and upload it to Tigris using the AWS SDK before
setting the job to done (2.
let artifact = rb.artifacts[0];
if (artifact.finishReason == "SUCCESS") {
  let imgdata = artifact.base64;
  var buf = Buffer.from(imgdata, "base64");
  const upload = new Upload({
    params: {
      Bucket: process.env.BUCKET_NAME,
      Key: `${job.id}.png`,
      Body: buf,
    },
    client: S3,
    queueSize: 3,
  });

  // Upload the file to Tigris
  await upload.done();

  await db.update(jobs).set({ status: 2 }).where(eq(jobs.id, job.id)).execute();
}
The background job
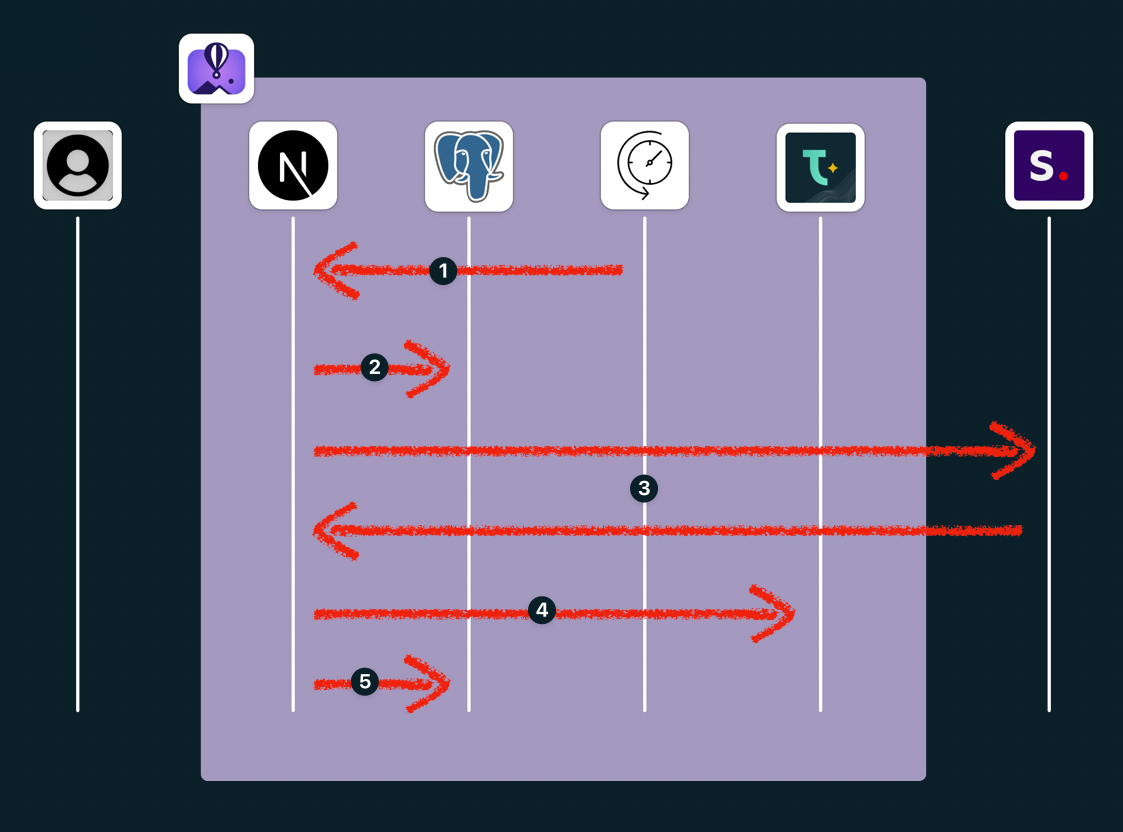
Using node-cron , a simple background job is used to poll the API endpoint
from the Next.js app. When polled, that endpoint will handle the next job in the
list. This is run as a secondary process in Fly using concurrently to avoid
needing unnecessary infrastructure, keeping the project isolated to a single
container. The following diagram demonstrates what’s performed in the background
job:
- The background job polls the API endpoint in Next regularly.
- When a job is detected, the API will set the status to
in progress. - Next will then dispatch a message to the Stability API, which will respond with a base64 encoded image when processing is complete.
- That image will be stored in a Tigris bucket.
- The database record is set to
complete.
See it in action
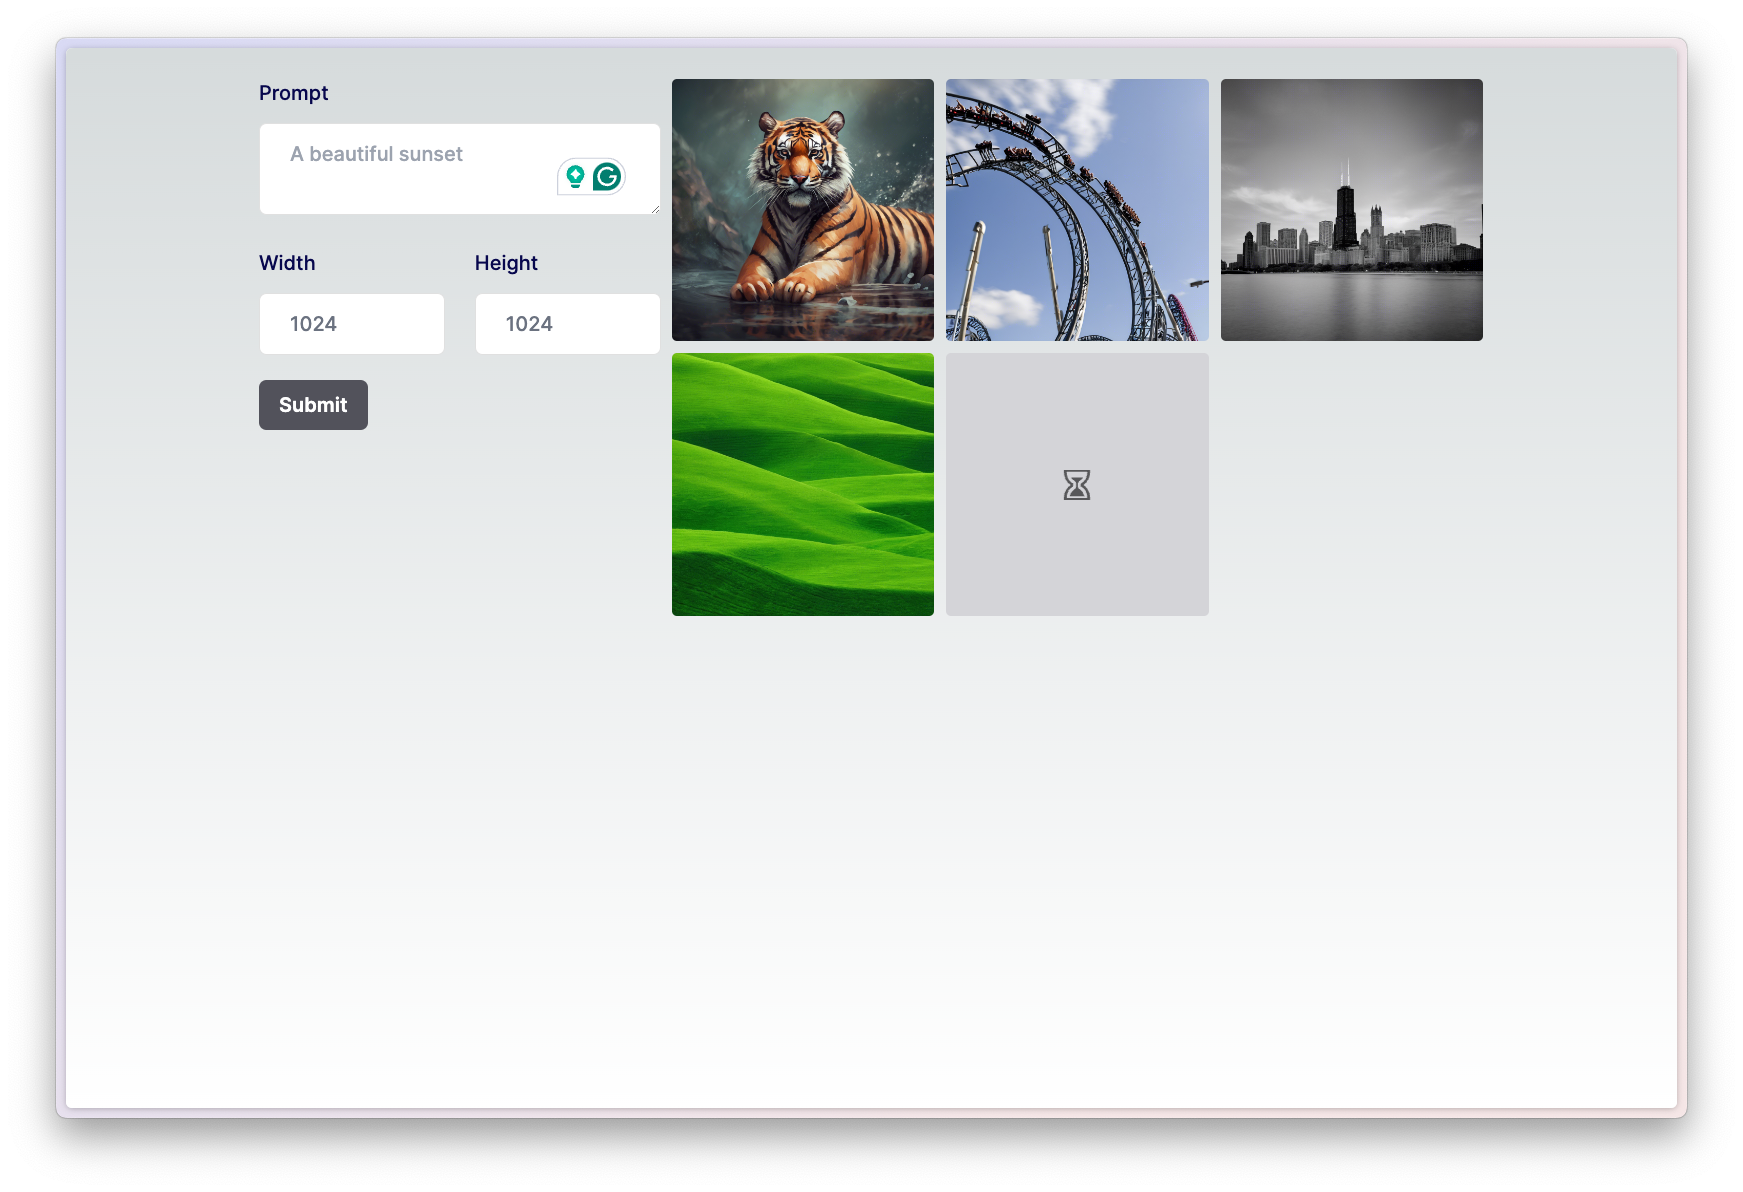
When a user provides a prompt, a new grid item will appear with an hourglass icon, indicating that it is waiting to be processed.
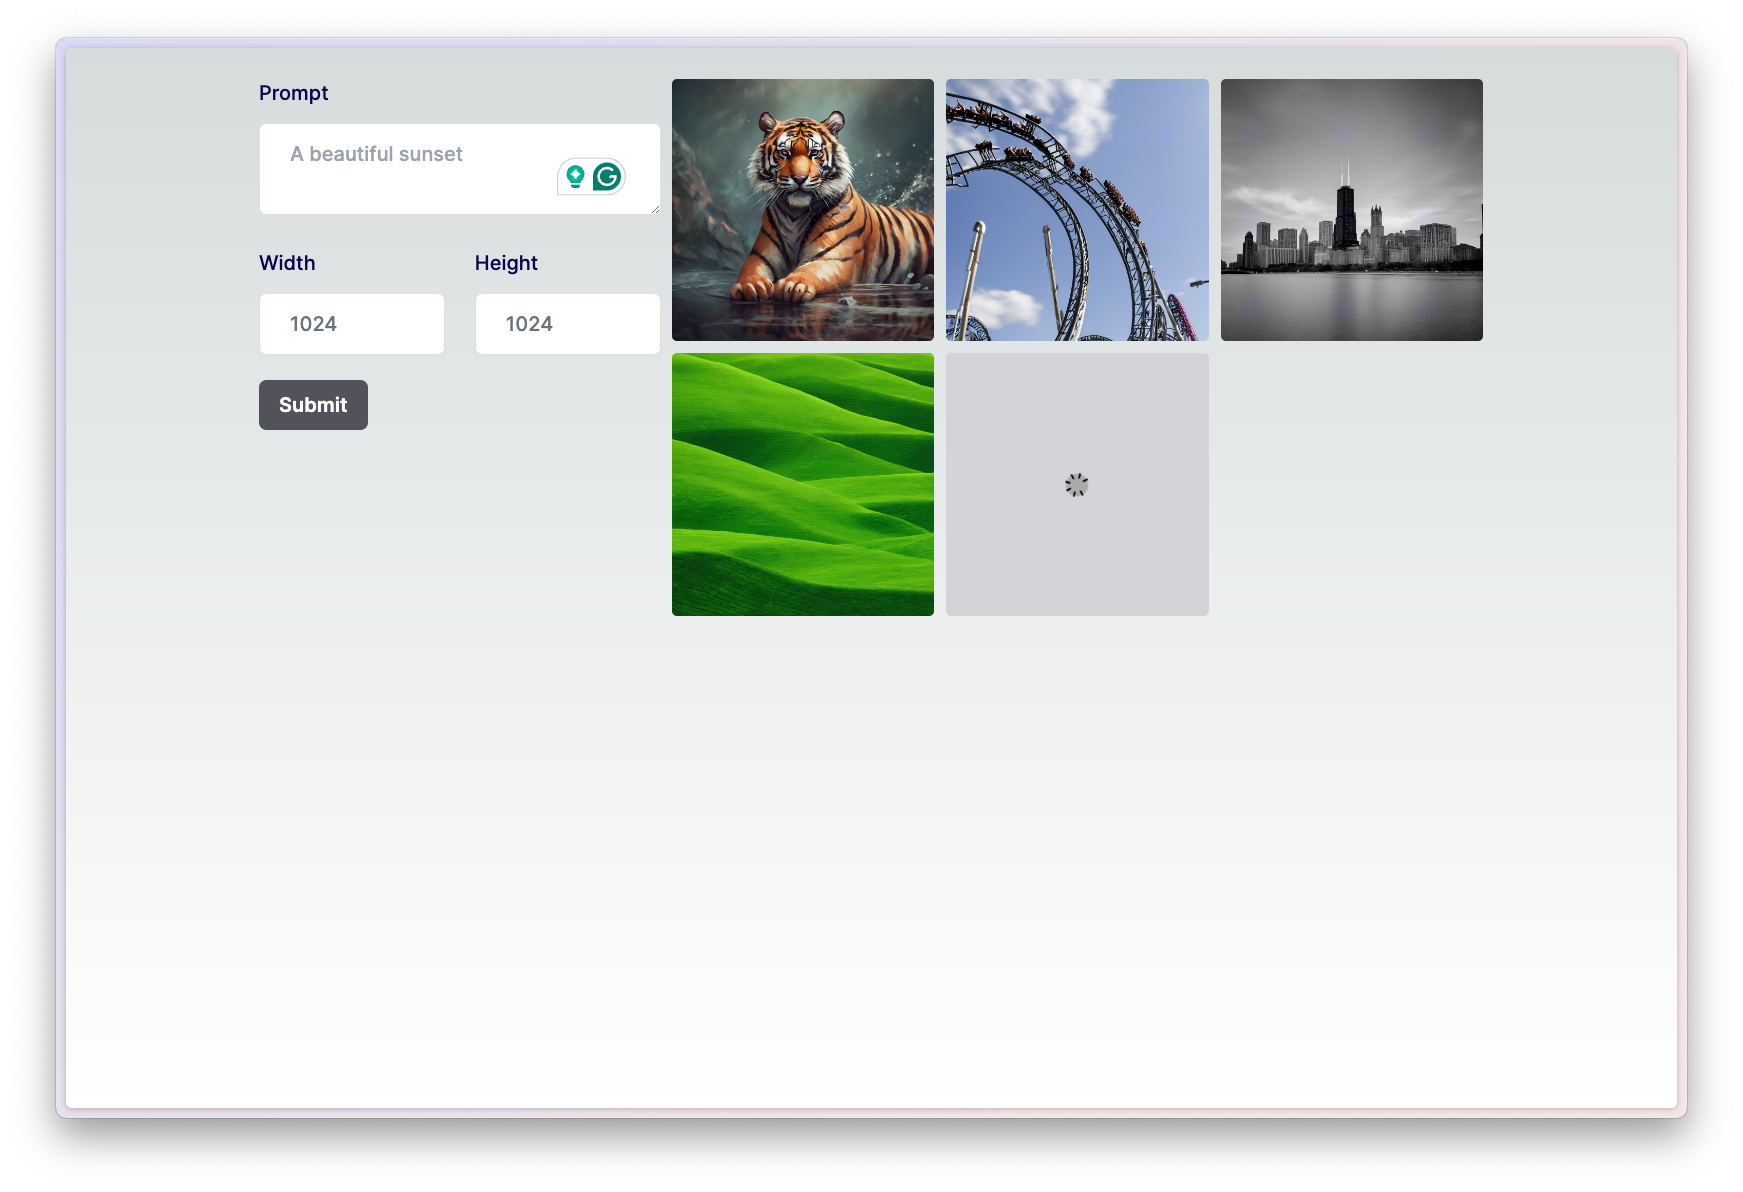
When the background job picks up the new request, the status will be updated in the database and the grid item will change to a spinner to show that it’s currently being processed.
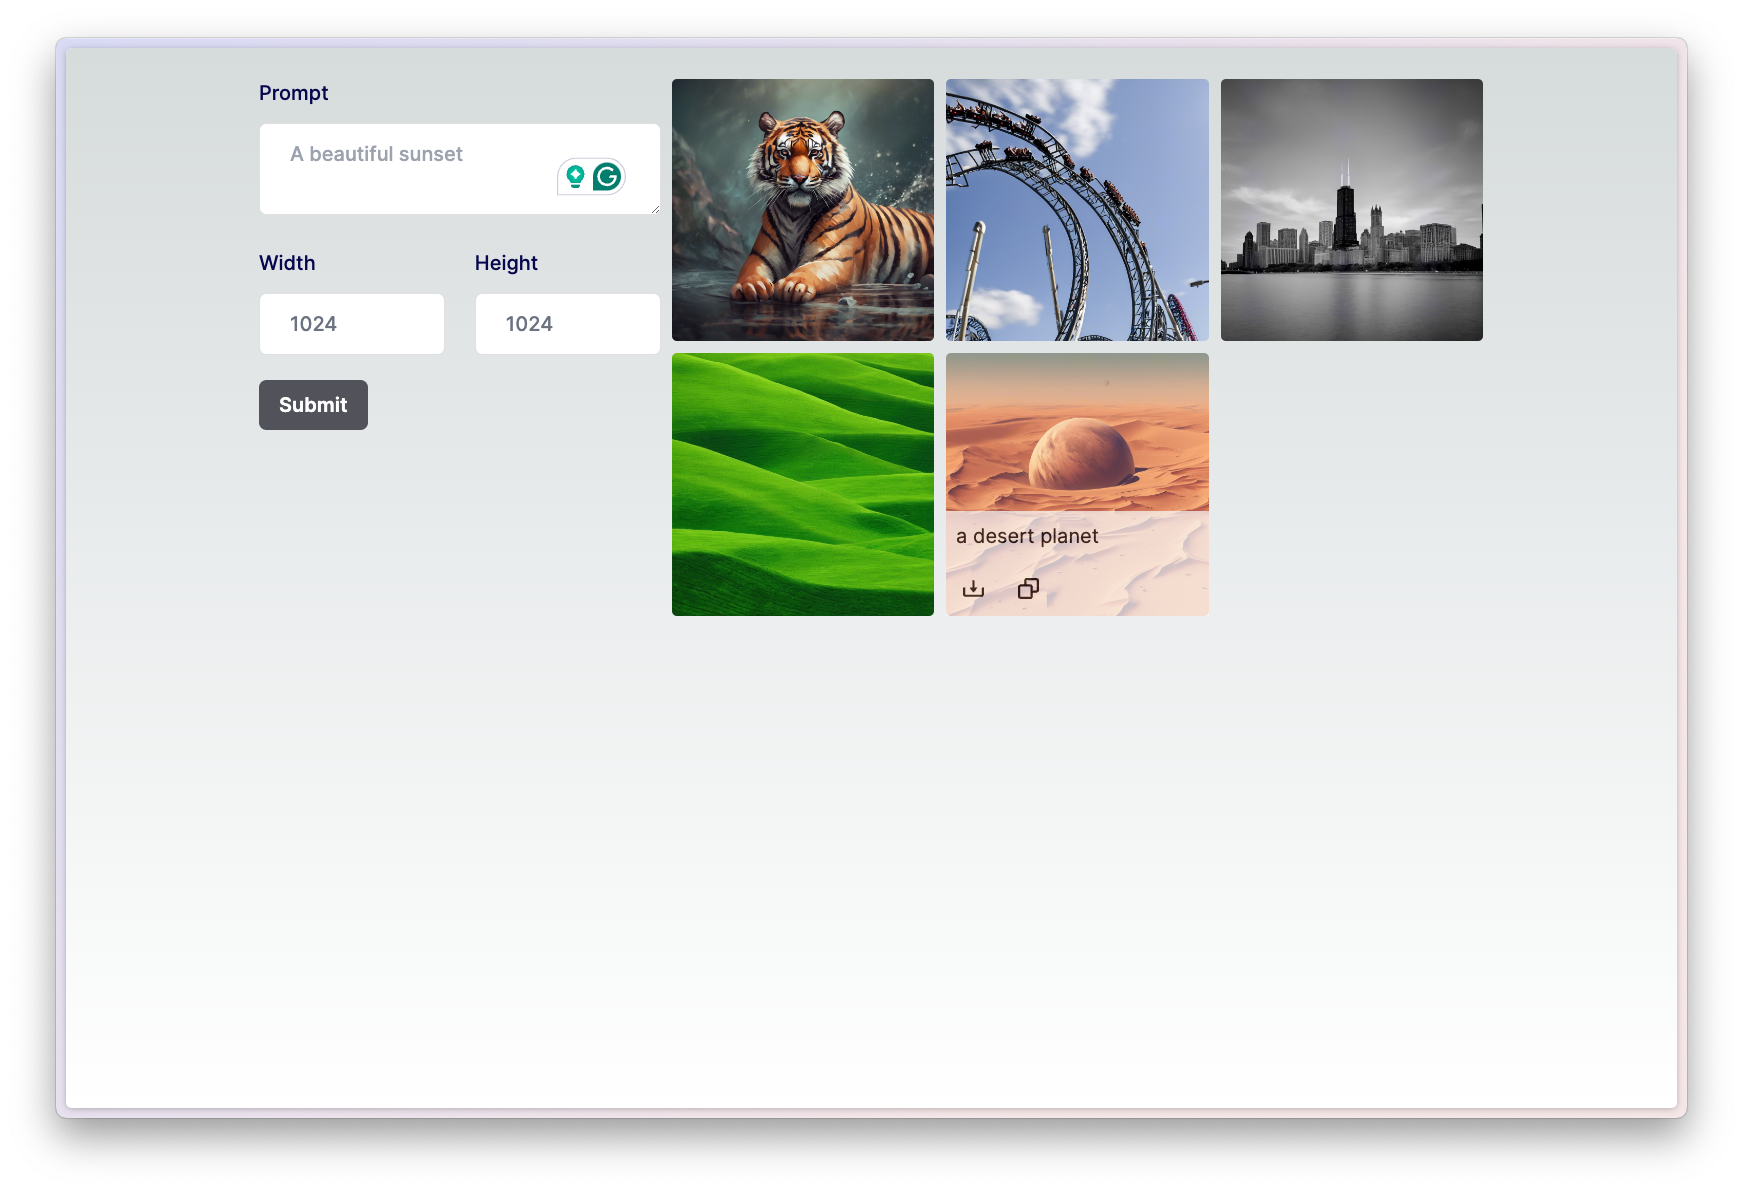
Once the job is completed and the image is available, hovering over the thumbnail will show you the original prompt, as well as provide options to download the image or copy the pre-signed URL to your clipboard for sharing.
Create a Stability API key
Before you can deploy the application, you’ll need to create an API key that will allow you to programmatically generate images using the Stability API. Start by heading to https://platform.stability.ai and create an account.
Once your account is created, you’ll be able to access your profile where you can create an API key. To do this, click on your avatar in the upper right.
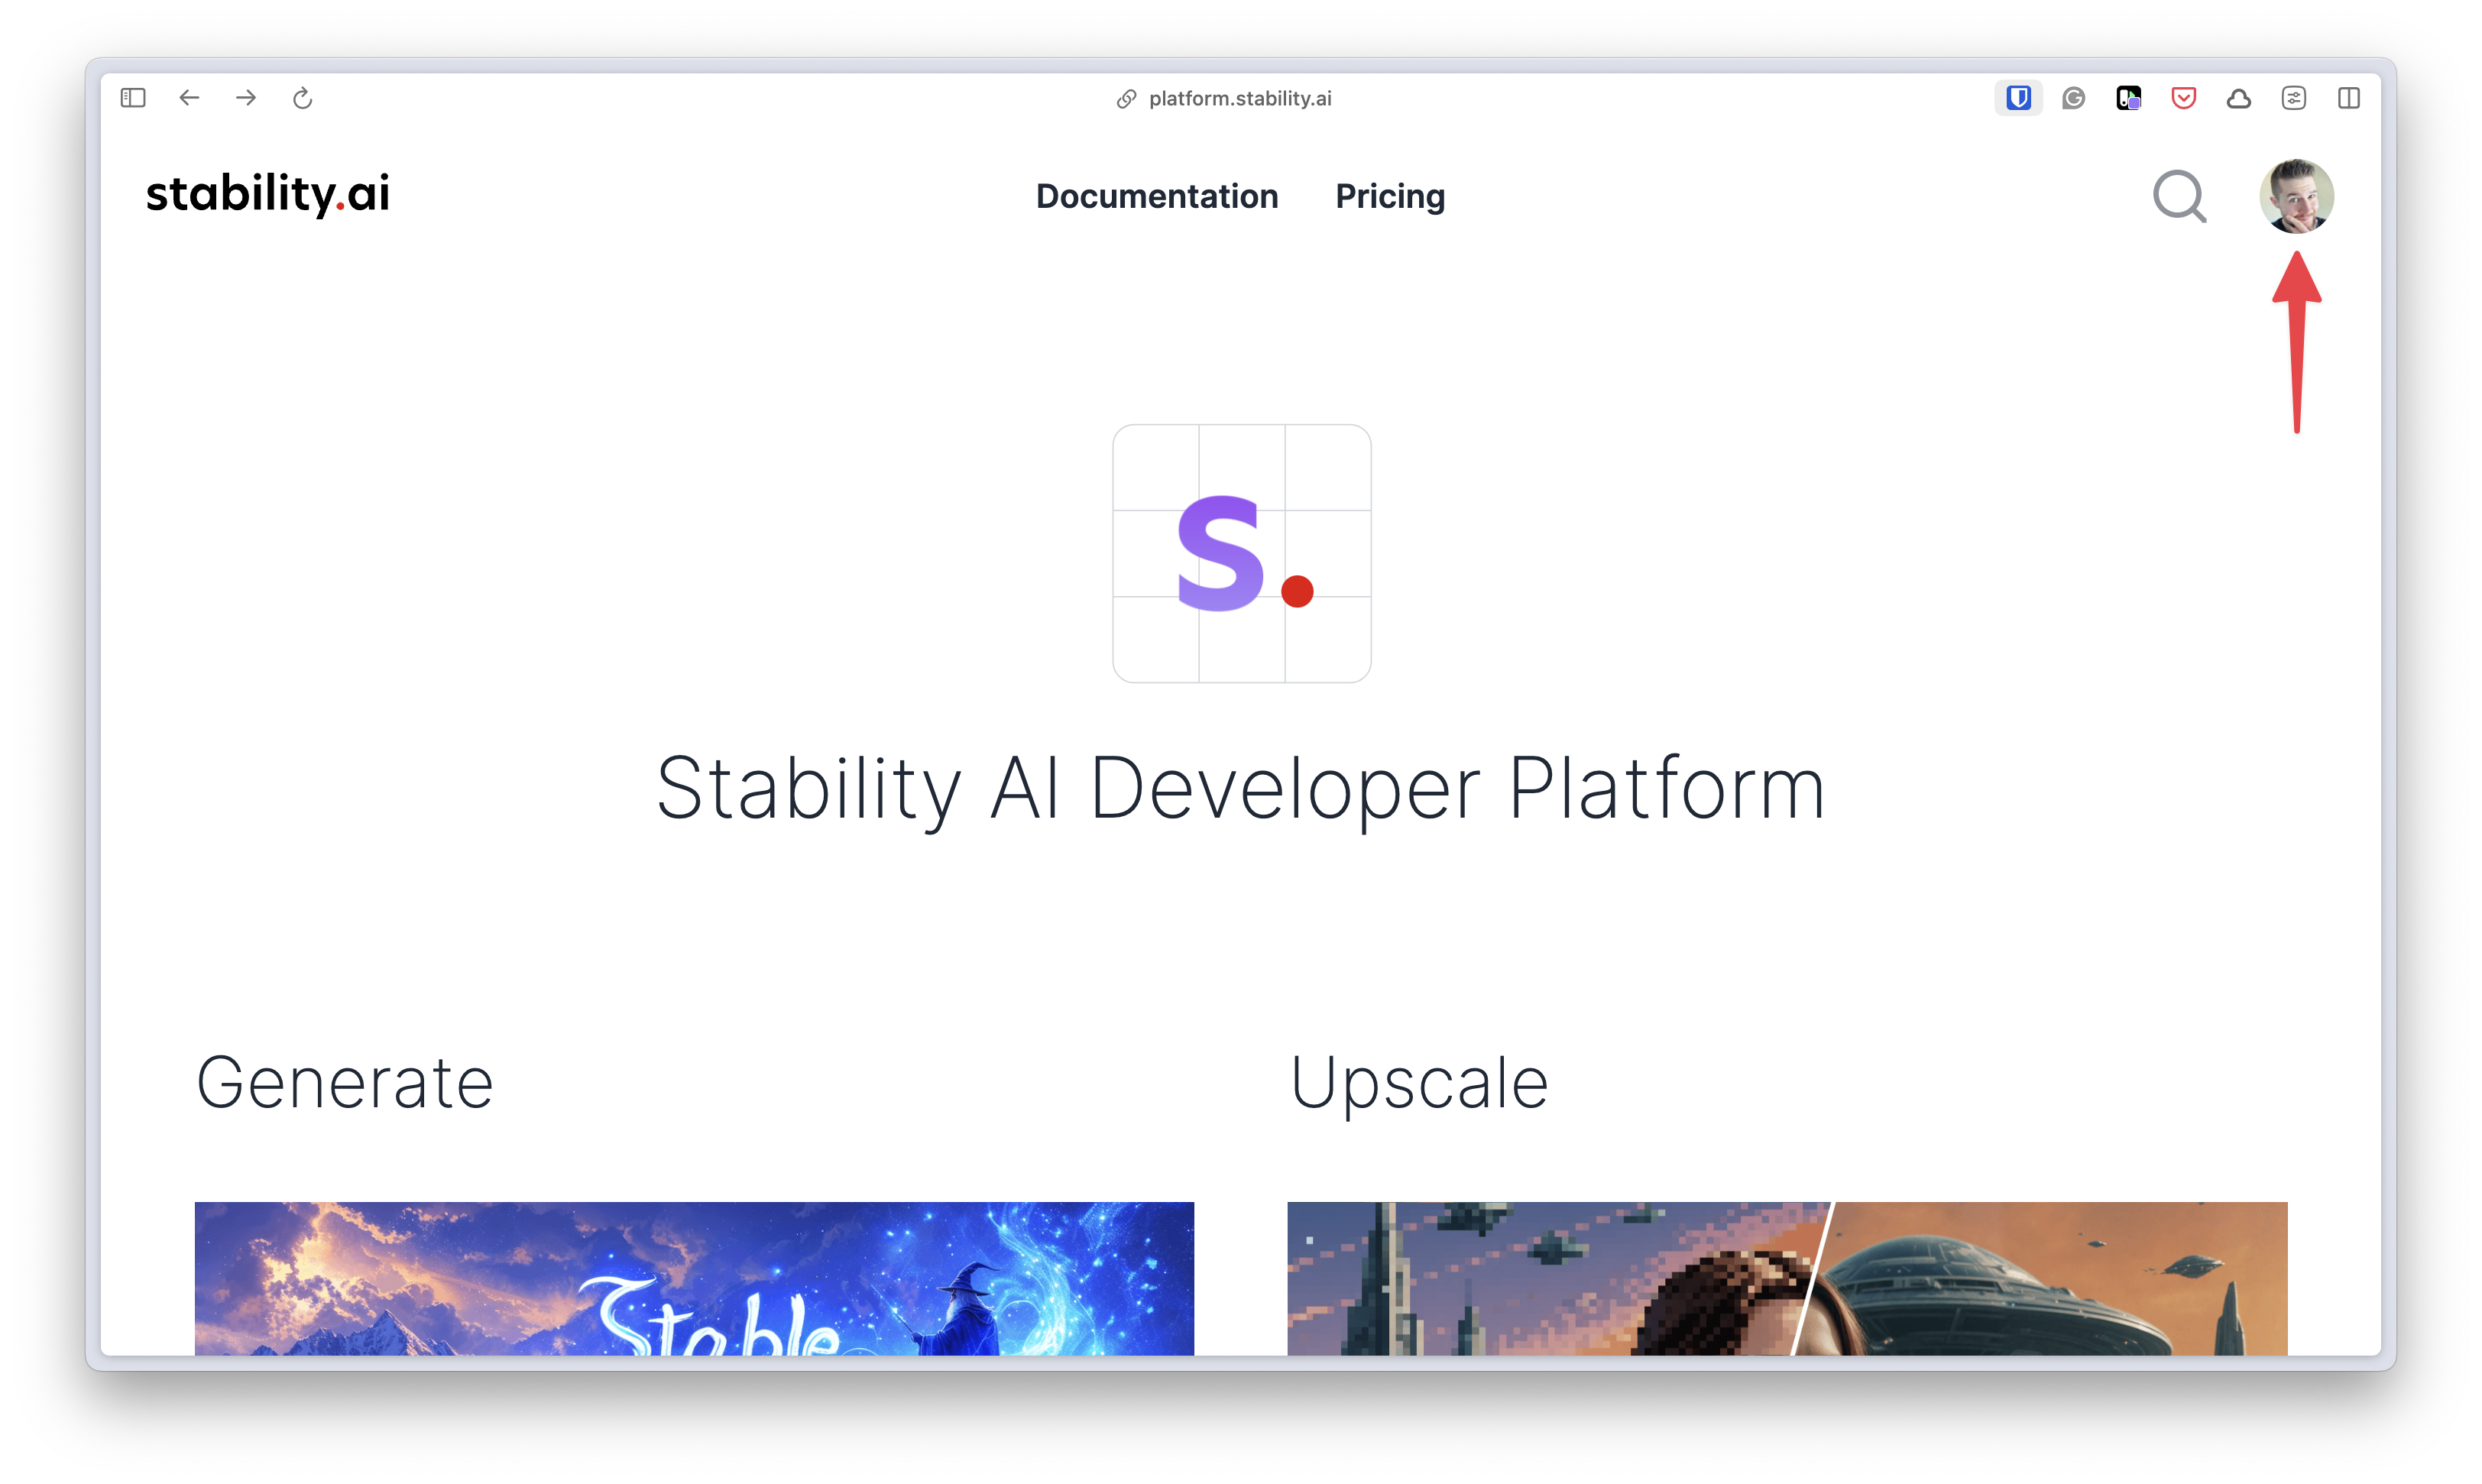
Then click the Create API Key button.
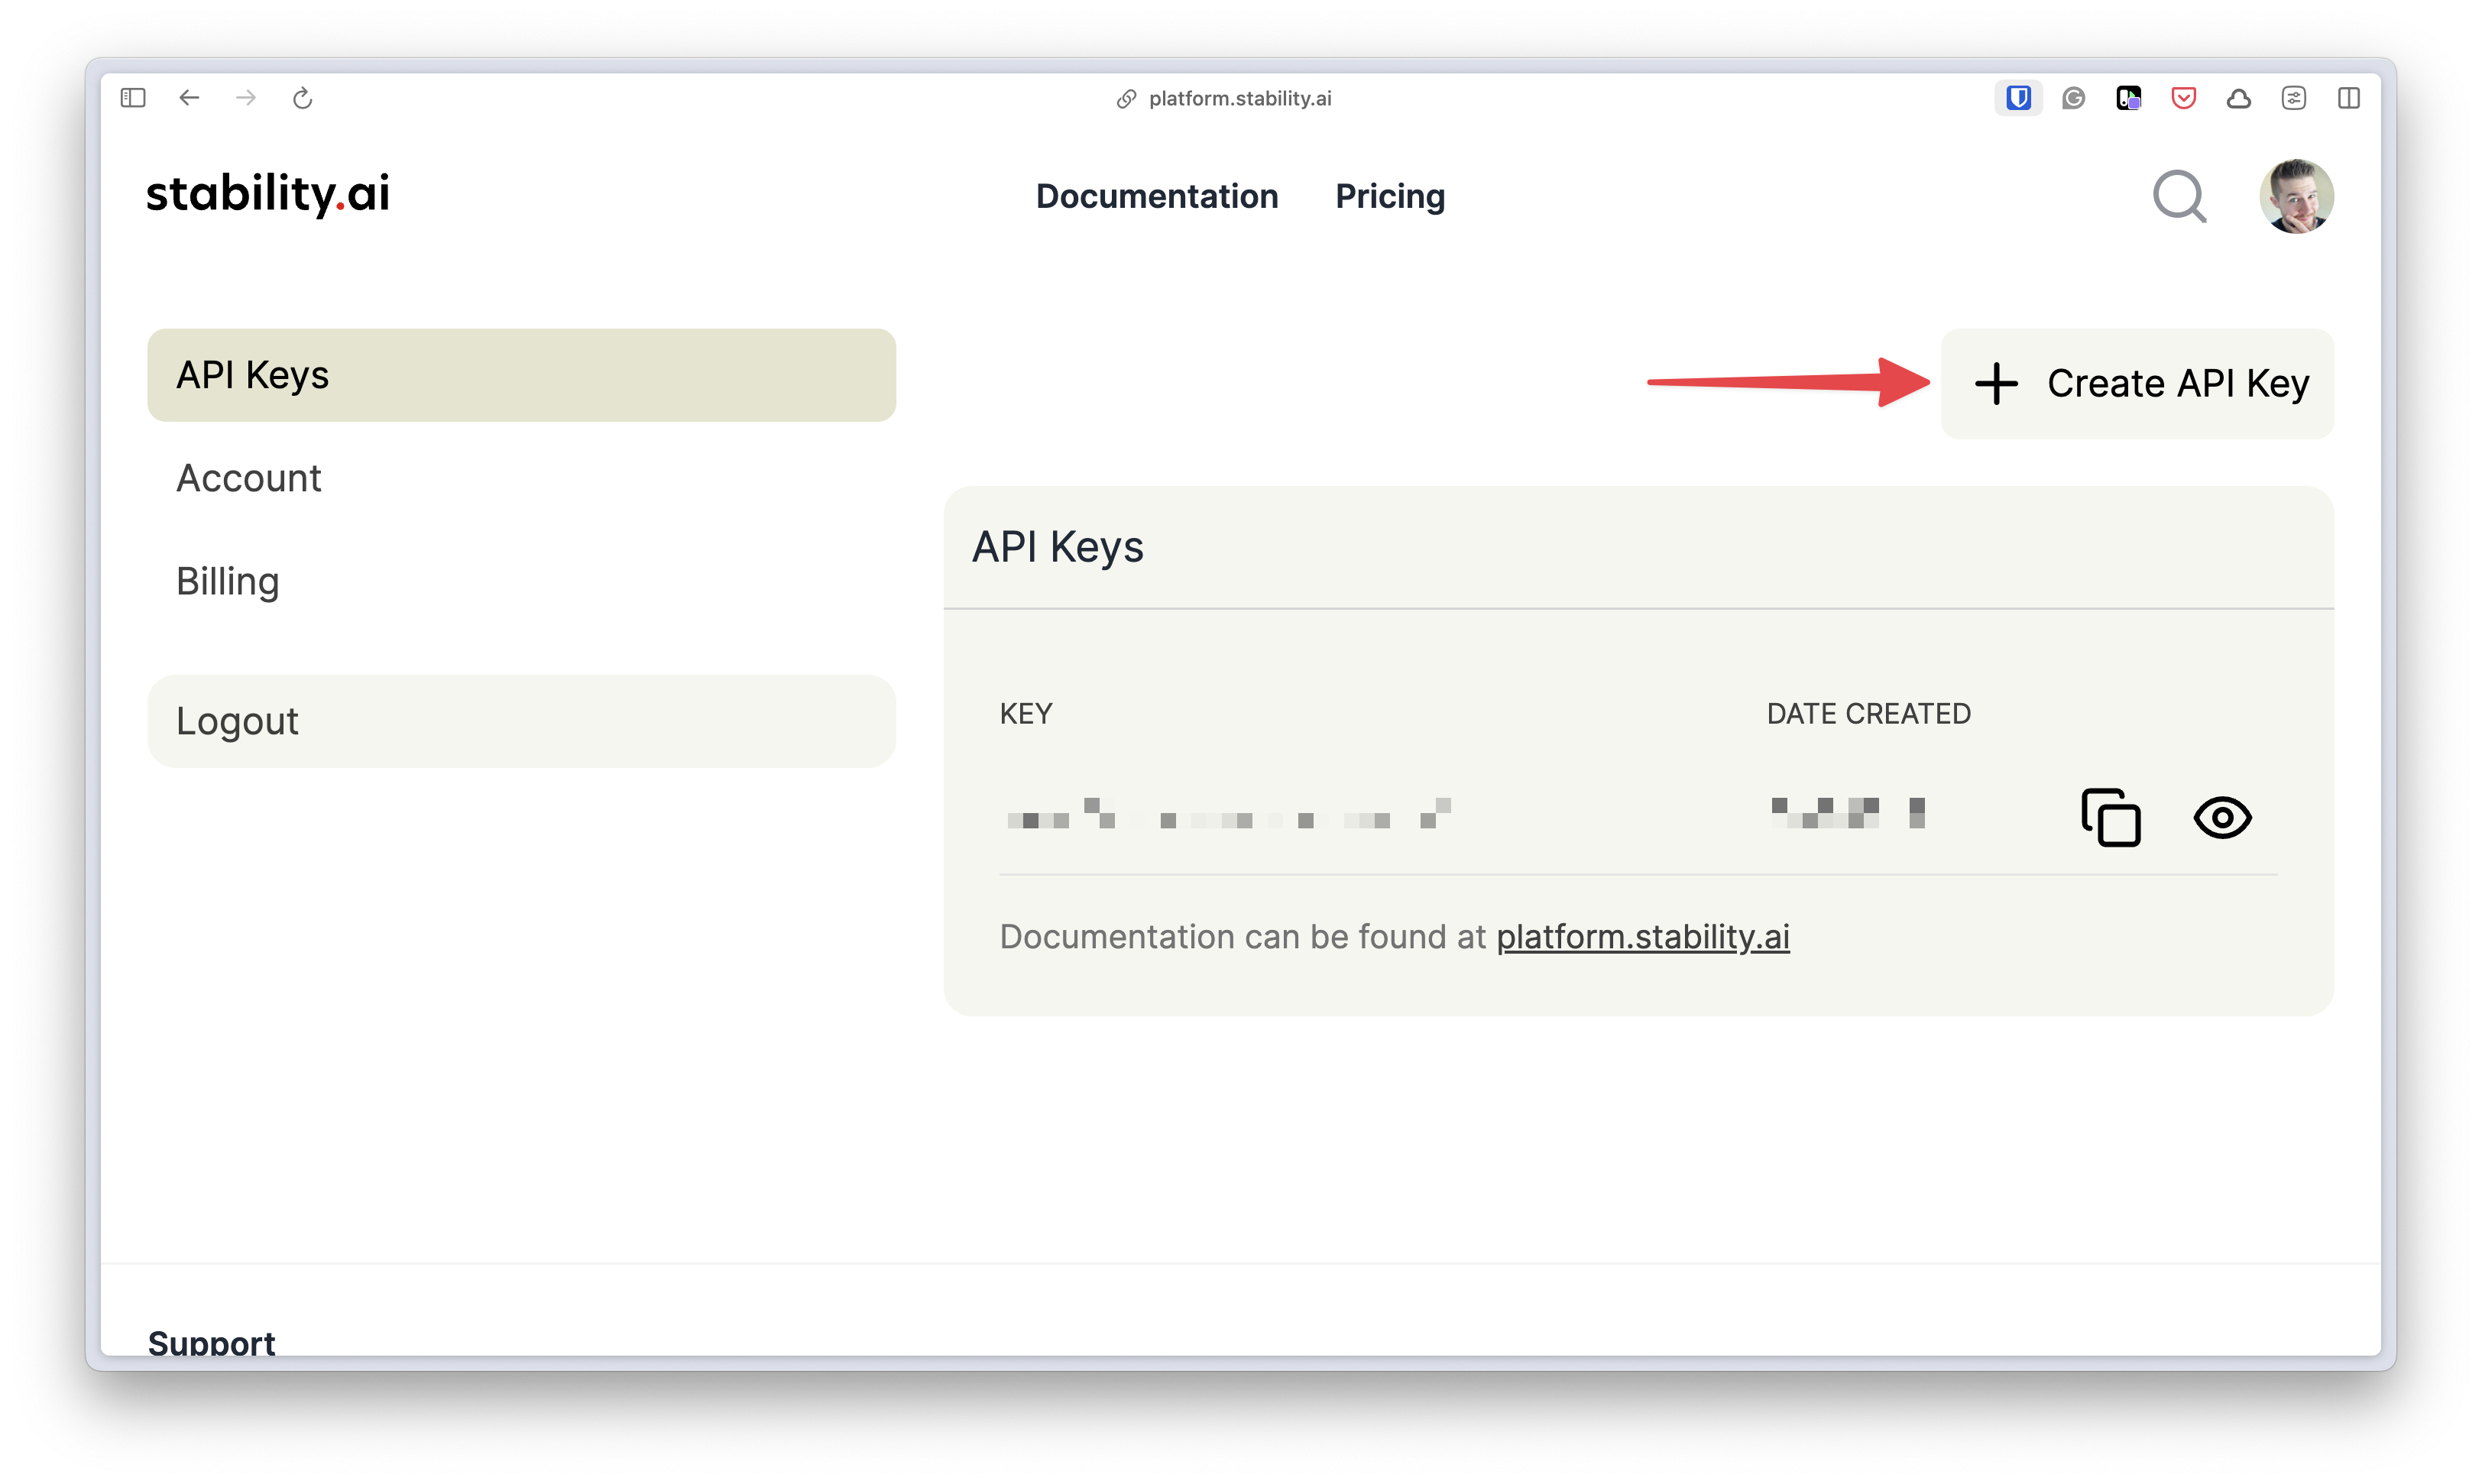
Take note of the API key that is generated as you’ll need it in a later step.
Deploy to Fly.io
Start the deployment process by cloning the repository to your computer. Open a terminal and run the following command to do so:
git clone https://github.com/bmorrisondev/sd-tigris-database.git
Navigate into the sd-tigris-database directory. Since all apps on
Fly.io require globally unique names, you’ll need to customize
the name of the app in the fly.toml file. You can set it to something
manually, or you can run the following command to automatically customize the
name:
npm install node rename.mjs
## Output:
## App name changed to sd-tigris-database-65b013f6fc
Next, run the following to deploy the application and database to Fly.io:
fly launch
Since a fly.toml is stored with the repository, it should contain all of the
necessary configurations to launch the app. When asked if you want to copy the
configuration, type y to do so.
Next, you’ll be asked to review the app that will be launched:
Organization:
  YOUR ORGANIZATION                                                    (fly
  launch defaults to the personal org)
Name:
  sd-tigris-database-65b013f6fc                                        (from
  your fly.toml)
Region:
  Ashburn, Virginia (US)                                               (from
  your fly.toml)
App Machines:
  shared-cpu-1x, 1GB RAM                                               (from
  your fly.toml)
Postgres:
  (Fly Postgres) 1 Node, shared-cpu-1x, 256MB RAM (1GB RAM), 10GB disk
  (determined from app source)
Redis:
  <none>                                                               (not
  requested)
Sentry:
  false                                                                (not
  requested)
When asked if you want to tweak the settings, type n to proceed. The main part
of your app will start deploying. Wait until the deployment is finished and take
note of the URL at the end:
Visit your newly deployed app at https://sd-tigris-database-65b013f6fc.fly.dev/
Configure the Postgres database
A Postgres database will be configured as part of the deployment, but you’ll
need to create the schema for the application before it will function properly.
This will be done using drizzle-kit and the provided schema.ts file.
Scroll up through the output of the deployment and locate the value for
DATABASE_URL. It should look something like this:
DATABASE_URL=postgres://sd_tigris_database_65b013f6fc:Eb2tnGHch9m9u90@sd-tigris-database-65b013f6fc-db.flycast:5432/sd_tigris_database_65b013f6fc?sslmode=disable
As it is now, this connection string won’t work locally, but we can tweak it a
bit before configuring a proxy using the Fly.io CLI tool.
Create a file in the root of the project named .env.local and paste the
connection string in it. Replace the hostname with 127.0.0.1. It should look
similar to this, but with different credentials:
DATABASE_URL=postgres://sd_tigris_database_65b013f6fc:Eb2tnGHch9m9u90@127.0.0.1:5432/sd_tigris_database_65b013f6fc?sslmode=disable
In the terminal, run fly apps ls to get a list of your applications. Take note
of the name ending in -db as this is the app that is the Postgres cluster
you’ll need to create the proxy to.
> fly app ls
NAME                                    OWNER           STATUS          LATEST DEPLOY
fly-builder-young-water-4407            personal        deployed
sd-tigris-database-65b013f6fc           personal        suspended       8m31s ago
sd-tigris-database-65b013f6fc-db        personal        deployed
Next, create a proxy using the following command, but replace the
sd-tigris-database-65b013f6fc-db with the name of your cluster:
fly proxy -a sd-tigris-database-65b013f6fc-db 5432
The fly proxy will prevent any further commands in that terminal window while
it’s running, so open another terminal at the root of the project and run the
following command to apply the schema changes:
npm run db:push
You should see a list of changes that will be made to the database, confirm these changes.
> sd-tigris-database@0.1.0 db:push
> drizzle-kit push:pg --config ./drizzle.config.ts

drizzle-kit: v0.20.14
drizzle-orm: v0.30.4

Custom config path was provided, using './drizzle.config.ts'
Reading config file '/Users/brian/Repos/sd-tigris-database/sd-tigris-database/drizzle.config.ts'
postgres://sd_tigris_database_65b013f6fc:Eb2tnGHch9m9u90@127.0.0.1:5432/sd_tigris_database_65b013f6fc?sslmode=disable

Warning  You are about to execute current statements:

CREATE TABLE IF NOT EXISTS "jobs" (
        "id" serial PRIMARY KEY NOT NULL,
        "prompt" text NOT NULL,
        "height" integer DEFAULT 500 NOT NULL,
        "width" integer DEFAULT 500 NOT NULL,
        "status" integer DEFAULT 0 NOT NULL,
        "error" text,
        "meta" json
);

  No, abort
❯ Yes, I want to execute all statements
You can now close the proxy if needed.
Configure the Tigris bucket
Next up, you’ll need to create the Tigris bucket that will be used to store the generated images. To do this, run the following command:
fly storage create
You can leave the prompt blank to generate a name automatically. This command will automatically update the environment variables of the app in Fly to use the bucket, meaning no further action is required.
Add Stability Key environment variable
The last step is to use the Stability API key you generated earlier in this guide and set it as an environment variable in Fly. Once set, Fly will automatically restart the underlying containers so they receive the newest set of variables.
fly secrets set STABILITY_API_KEY={YOUR_KEY_HERE}
After adding the environment variables, you should be able to access the app using the URL you grabbed earlier.
Conclusion
Creating AI-generated images and storing them is just one excellent use case for Tigris. To learn more about what Tigris can do, check out the documentation portal for a more complete list of features!
